
How to Change a Tire: A Complete Step-by-Step Guide
A flat tire can happen almost anywhere, and knowing how to change a tire is one of the most useful skills I think every driver should have. The process itself is not especially complicated, but doing it safely matters far more than doing it quickly.
In this guide, I’ll walk through exactly how to change a tire step by step, what tools you need, where to place the jack, how to loosen and tighten lug nuts, what mistakes to avoid, and what to do after installing the spare tire.
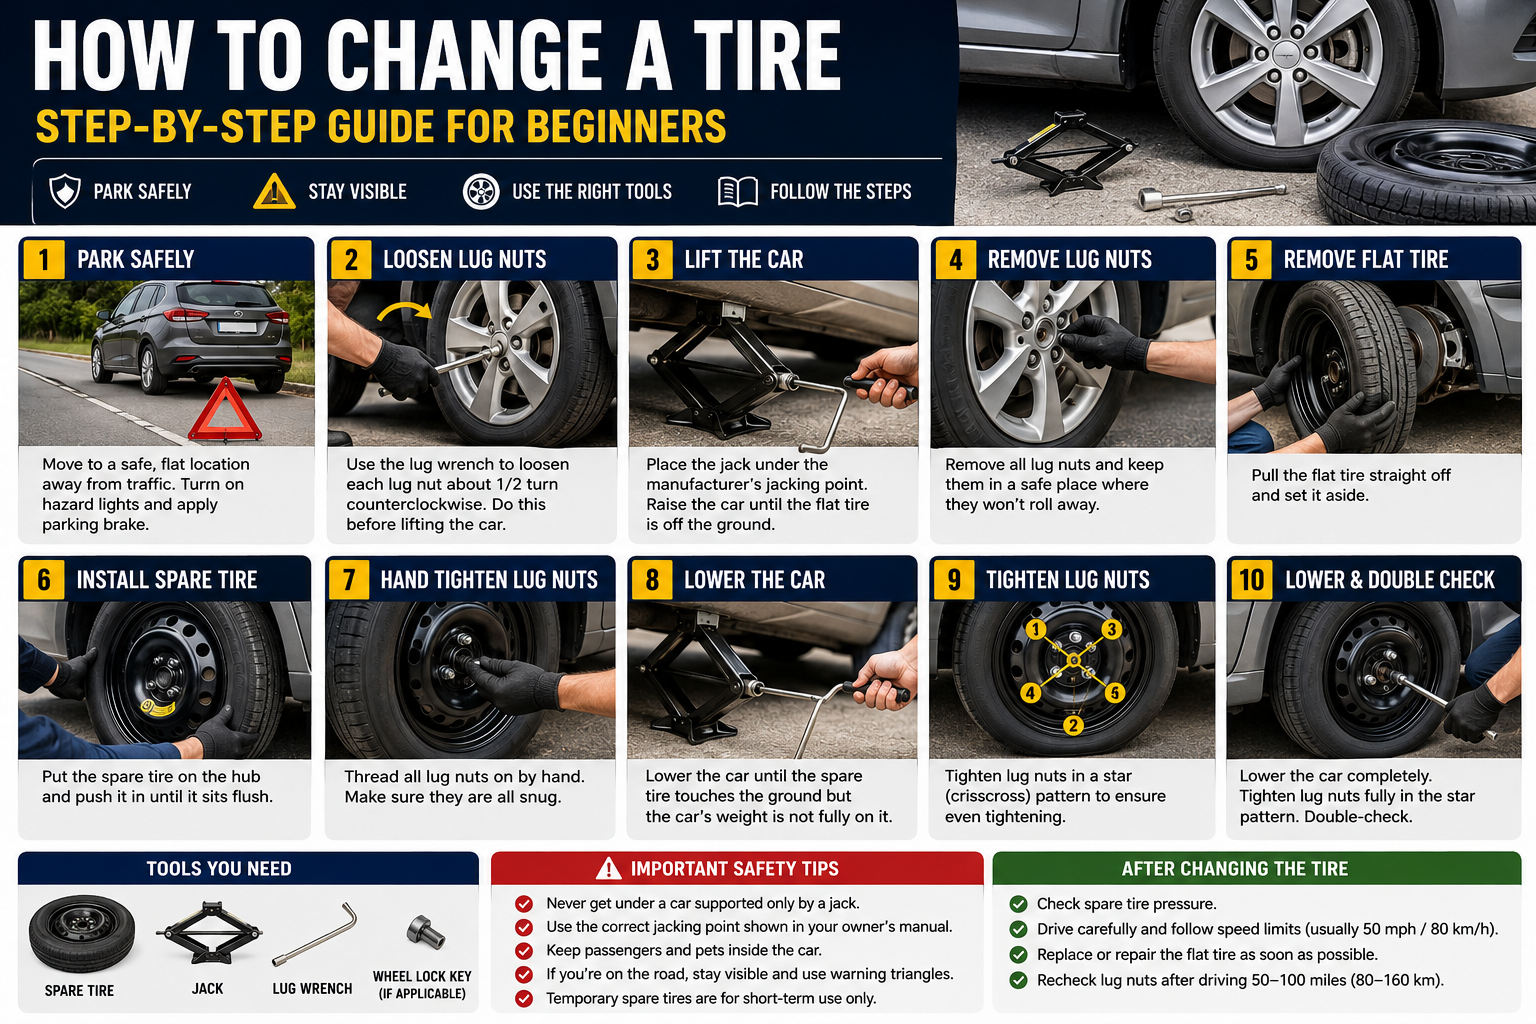
The basic process is simple: move the vehicle to a safe location, secure it from rolling, loosen the lug nuts slightly, raise the vehicle using the correct jacking point, remove the flat tire, install the spare, lower the vehicle, and tighten the lug nuts properly.
How to Change a Tire: Quick Answer
- Move the vehicle to a safe, flat location.
- Turn on the hazard lights and apply the parking brake.
- Remove the spare tire, jack, and lug wrench.
- Loosen the lug nuts slightly before lifting the vehicle.
- Position the jack at the manufacturer’s recommended jacking point.
- Raise the vehicle until the flat tire clears the ground.
- Remove the lug nuts and flat tire.
- Install the spare tire.
- Hand-tighten the lug nuts.
- Lower the vehicle until the tire touches the ground.
- Tighten the lug nuts in a star or crisscross pattern.
- Lower the vehicle completely and recheck the lug nuts.
Important: Never crawl underneath a vehicle supported only by an emergency jack. A roadside jack is designed to lift the vehicle for a tire change, not to safely support someone working underneath it.
What You Need to Change a Tire
Most vehicles originally come with the basic equipment needed for an emergency tire change, although it is worth checking your vehicle before you actually need it.
I recommend confirming that your vehicle contains the following:
- A properly inflated spare tire
- A vehicle jack
- A lug wrench or wheel wrench
- Your vehicle owner’s manual
- A wheel-lock key if your wheels use locking lug nuts
I also like keeping several optional items in the car because they make roadside tire changes considerably safer and easier:
- Reflective warning triangles
- Reflective safety vest
- Flashlight or headlamp
- Work gloves
- Tire pressure gauge
- Portable tire inflator
- Wheel chocks
- Kneeling pad or old towel
- Torque wrench
A torque wrench is not normally included with a vehicle, but it is the correct tool for tightening lug nuts to the manufacturer’s specified torque once the vehicle is safely on the ground.
Before You Start: Make Safety the First Priority
The most important part of changing a tire happens before you touch the jack.
If you notice a flat tire while driving, reduce speed gradually and avoid sudden steering or hard braking. Turn on your hazard lights and look for a safe place to stop.
Ideally, I want the vehicle positioned on:
- Firm pavement
- Level ground
- A location well away from moving traffic
- A location with enough space to work around the damaged wheel
A parking lot or wide paved shoulder is far better than soft dirt, loose gravel, a steep hill, or a narrow roadside.
If the only available location leaves you exposed to fast-moving traffic, changing the tire yourself may not be the safest option. Moving farther away from traffic or contacting roadside assistance may be preferable.
Step 1: Park the Vehicle on Firm, Level Ground
Once you have found a safe location, place the transmission in Park if you drive an automatic vehicle. For a manual transmission, follow the vehicle manufacturer’s parking instructions, which commonly include placing the vehicle in gear.
Apply the parking brake firmly.
The goal is to prevent the vehicle from moving while one wheel is lifted from the ground.
Do not intentionally jack up a vehicle on a steep incline unless there is no safer alternative. A vehicle can shift or slide from the jack, creating a serious injury risk.
Step 2: Turn On the Hazard Lights
Turn on the hazard warning lights before beginning the repair, especially if you are stopped near a roadway.
If you have reflective triangles, place them where approaching drivers can see them without putting yourself in danger.
At night, a reflective vest and flashlight can also make a significant difference in visibility.
Step 3: Use Wheel Chocks if Available
Wheel chocks help keep the vehicle from rolling while it is raised.
If you are changing a front tire, chocking a rear wheel is useful. If you are changing a rear tire, chocking a front wheel helps provide additional security.
Place the chock against the tire so that the vehicle cannot roll toward the direction of potential movement.
I consider wheel chocks inexpensive insurance. They are especially useful when changing a tire in a driveway or other location that may appear level but has a slight slope.
Step 4: Remove the Spare Tire and Tools
Before lifting the vehicle, take out everything you will need.
Depending on the vehicle, the spare tire may be located:
- Under the trunk floor
- Underneath the rear of the vehicle
- Inside a rear cargo compartment
- Mounted externally on the rear door
- Under a pickup truck bed
Your jack and lug wrench are usually stored near the spare tire.
This is also the time to locate your wheel-lock key if your vehicle has locking lug nuts.
Step 5: Remove the Wheel Cover or Hubcap if Necessary
Some vehicles use wheel covers that hide the lug nuts.
If the lug nuts are exposed, you can skip this step.
If a cover blocks access, remove it according to the vehicle manufacturer’s instructions. Some wheel covers pry off, while others are held in place by the lug nuts themselves.
Avoid forcing plastic trim with excessive pressure because older wheel covers can become brittle and crack.
Step 6: Loosen the Lug Nuts Before Jacking Up the Vehicle
This step is important.
Before raising the wheel off the ground, use the lug wrench to loosen each lug nut approximately one-quarter to one-half turn.
Do not remove them completely yet.
The tire needs to remain in contact with the ground so it does not rotate while you apply force to the lug wrench.
Which Direction Do Lug Nuts Loosen?
On nearly all modern passenger vehicles, lug nuts loosen by turning them counterclockwise when viewed directly from the outside of the wheel.
A simple memory aid is:
Left to loosen, right to tighten.
What If the Lug Nuts Are Extremely Tight?
Lug nuts can become difficult to remove because of corrosion or because they were previously tightened excessively with an impact wrench.
Make sure the lug wrench is fully seated on the lug nut before applying pressure.
Using steady pressure is preferable to violently jumping on the wrench. Sudden force can make the wrench slip or cause you to lose your balance.
If the lug nut will not move without unsafe force, roadside assistance may be the better option.
Step 7: Find the Correct Jacking Point
Never place the jack randomly under the floor of the vehicle.
Vehicles have reinforced lifting points designed to support the weight of the car. The exact location varies by manufacturer and model.
Common locations include reinforced pinch welds behind the front wheels and ahead of the rear wheels.
Your owner’s manual should show the correct jack placement.
Using the wrong location can damage:
- Rocker panels
- Floor pans
- Bodywork
- Fuel or brake lines
- Plastic underbody panels
More importantly, improper jack placement can cause the vehicle to become unstable.
Step 8: Position the Jack Correctly
Place the jack on firm, solid ground directly below the recommended lifting point.
Make sure the jack sits flat and stable before you begin raising the vehicle.
If you are using the factory scissor jack, align its lifting saddle exactly as shown in your owner’s manual.
Do not place the jack on loose gravel, sand, mud, or an unstable object.
I would also avoid using random pieces of wood unless the manufacturer specifically recommends an appropriate support method. Improvised supports can split or shift unexpectedly.
Step 9: Raise the Vehicle
Slowly operate the jack and begin lifting the vehicle.
Keep an eye on both the jack and the vehicle as you raise it.
If the jack starts leaning, shifting, or sinking into the surface, stop immediately and lower the vehicle.
Raise the vehicle only high enough for the flat tire to clear the ground.
Remember that the replacement spare tire may have a slightly larger diameter than the completely flat tire, so you may need a little additional clearance.
Step 10: Remove the Lug Nuts
Now that the wheel is off the ground, finish removing the loosened lug nuts by hand or with the lug wrench.
Place them somewhere clean and easy to find.
I usually recommend putting them in the removed wheel cover, a container, or another secure location. Losing a lug nut in grass or gravel is surprisingly easy.
Step 11: Remove the Flat Tire
Grip the tire with both hands and pull it straight toward you.
Most wheels slide off fairly easily, but corrosion between the wheel and hub can occasionally make a wheel stick.
If the wheel refuses to move, avoid crawling underneath the car or using aggressive techniques while the vehicle is supported by the emergency jack.
Once removed, place the flat tire flat on the ground rather than standing it upright where it could roll away.
If practical, you can also slide it partially underneath the vehicle near the side sill as an additional precaution, but it should never be treated as a substitute for proper lifting equipment.
Step 12: Inspect the Spare Tire
Before installing the spare, look at its condition.
Check for:
- Visible cracks
- Severe dry rot
- Damage to the tread or sidewall
- Obvious loss of air pressure
- Missing valve cap
A spare tire can lose pressure even when it has never been used.
This is why I recommend checking spare-tire pressure periodically instead of waiting until you have a flat.
Step 13: Install the Spare Tire
Lift the spare tire and align the wheel holes with the wheel studs.
Push the wheel onto the hub until it sits flush against the mounting surface.
This can be awkward because wheels are heavier than they look. Use your legs rather than your back when lifting.
For vehicles that use wheel bolts instead of studs and lug nuts, installation can be slightly more difficult because the wheel must be held in alignment while the bolts are inserted.
Step 14: Install the Lug Nuts by Hand
Thread each lug nut onto its stud by hand first.
This is an important habit because it helps prevent cross-threading.
Each nut should turn smoothly for several rotations.
If a lug nut immediately feels tight, crooked, or rough, stop and remove it. Forcing a cross-threaded lug nut can damage the wheel stud.
Once all lug nuts are installed finger-tight, use the wrench to snug them gently.
Do not fully tighten them while the vehicle is still completely raised.
Step 15: Tighten Lug Nuts in a Star Pattern
When tightening wheels, the sequence matters.
Rather than tightening neighboring lug nuts one after another around the wheel, use an alternating or star-shaped pattern.
For a typical five-lug wheel:
- Tighten one lug nut.
- Move to the lug nut approximately opposite it.
- Continue crossing the wheel.
This pattern helps seat the wheel evenly against the hub.
For four-, six-, or eight-lug wheels, use a similar crisscross pattern.
Step 16: Lower the Vehicle Until the Tire Touches the Ground
Lower the jack slowly until the spare tire contacts the ground but most of the vehicle’s weight is not yet fully resting on it.
This gives you enough resistance to tighten the lug nuts without allowing the wheel to rotate freely.
Step 17: Tighten the Lug Nuts Securely
Using the star pattern again, tighten each lug nut firmly.
The ideal method is to use a torque wrench set to the manufacturer’s specified lug-nut torque.
Torque specifications vary by vehicle, so I would not use a generic value.
Check your owner’s manual or manufacturer service information for the correct specification.
Why Proper Lug-Nut Torque Matters
Lug nuts that are too loose can allow the wheel to move or detach.
Lug nuts that are excessively tight can:
- Damage wheel studs
- Stretch threads
- Make roadside removal extremely difficult
- Potentially contribute to uneven wheel mounting
This is why “as tight as possible” is not the correct approach.
Step 18: Lower the Vehicle Completely
Once the lug nuts are snug, lower the vehicle fully and remove the jack.
Perform another tightening pass using the proper pattern.
If you have a torque wrench available, this is the time to torque each lug nut according to the vehicle manufacturer’s specification.
Step 19: Replace the Wheel Cover if Appropriate
If your spare wheel accepts the original wheel cover, reinstall it.
Some temporary spare wheels are not designed to use the original wheel cover, so store the cover safely with the damaged tire instead.
Step 20: Check the Spare Tire Pressure
A spare tire is only useful if it has enough air pressure.
If you have a tire-pressure gauge, check the spare before driving.
Temporary spare tires often require significantly higher inflation pressure than normal tires, commonly around 60 psi, but always use the pressure marked on the spare tire or specified by your vehicle manufacturer rather than assuming a universal number.
Temporary Spare Tire vs. Full-Size Spare
Not every spare tire works the same way.
Temporary “Donut” Spare
A compact temporary spare is lighter and takes up less cargo space, but it is designed only for short-term emergency use.
These tires normally have strict speed and distance limits.
A common maximum speed is approximately 50 mph or 80 km/h, but you should follow the exact limit printed on your spare tire or stated in your owner’s manual.
Do not treat a temporary spare as a normal replacement tire.
Full-Size Spare
A full-size spare is closer to your normal wheel and tire setup and may allow more normal driving.
However, tread depth, tire age, pressure, tire type, and wheel dimensions can still differ from the other tires.
I would still have the damaged tire repaired or replaced as soon as practical.
How Long Does It Take to Change a Tire?
For someone familiar with the process and working in good conditions, changing a tire may take approximately 15 to 30 minutes.
A first-time tire change can easily take longer.
Conditions such as darkness, rain, traffic, seized lug nuts, difficult spare-tire access, or an unfamiliar jack can all add time.
I would never treat speed as the goal. Safe positioning, correct jack placement, and proper wheel installation are much more important than finishing quickly.
How Do I Know Where to Put the Jack?
The safest answer is simple: check your owner’s manual.
Vehicle jacking points are engineered reinforced sections of the body or chassis.
On many passenger cars, the emergency lifting points are located along the pinch weld beneath the rocker panel.
On SUVs, trucks, EVs, and vehicles with unusual suspension or battery layouts, the lifting locations may be very different.
This is especially important on electric vehicles because incorrect jack placement can potentially damage underbody components, including battery protection structures.
Can You Change a Tire on a Hill?
I strongly prefer not to.
A sloped surface increases the risk that the vehicle will roll or shift from the jack.
If possible, move to a flat, firm location before attempting the tire change.
If you cannot safely reach level ground, roadside assistance may be the better choice.
Should the Parking Brake Be On?
Yes.
The parking brake should normally be engaged while changing a tire because it helps prevent the vehicle from moving.
You should also place an automatic transmission in Park and use wheel chocks when available.
Should You Loosen Lug Nuts Before or After Jacking?
Loosen the lug nuts slightly before lifting the vehicle.
If the wheel is already off the ground, it may rotate when you try to loosen the nuts.
Keeping the tire on the ground provides resistance and makes the initial loosening process easier and safer.
Only loosen them enough to break them free. Remove them completely after the vehicle is raised.
Common Mistakes to Avoid When Changing a Tire
1. Changing the Tire Too Close to Traffic
No tire is worth risking your safety.
If you cannot create enough distance from moving vehicles, seek a safer location or professional assistance.
2. Jacking on Soft Ground
A jack can sink into dirt, sand, or soft asphalt.
This can make the vehicle unstable and cause it to fall.
3. Using the Wrong Jacking Point
Placing the jack under an unsupported section of bodywork can damage the vehicle and may cause the jack to slip.
4. Removing Lug Nuts Before Lifting the Vehicle
Loosen them first, but do not fully remove them until the wheel is safely off the ground.
5. Getting Under the Vehicle
Never position any part of your body under a vehicle supported only by an emergency jack.
6. Forgetting to Tighten the Lug Nuts
After lowering the vehicle, recheck every lug nut using the correct tightening sequence.
7. Overtightening Lug Nuts
Extreme force is not better. Use the manufacturer’s specified torque whenever possible.
8. Driving Normally on a Temporary Spare
Temporary spare tires usually have lower speed and distance limits than normal tires.
9. Forgetting About the Spare Tire
A spare can slowly lose air for years without being noticed.
Check it periodically as part of routine vehicle maintenance.
What to Do After Changing the Tire
Installing the spare is not necessarily the end of the repair.
Once you are back on the road, I recommend:
- Drive cautiously.
- Follow the spare-tire speed limitation.
- Avoid hard acceleration and aggressive cornering.
- Have the damaged tire inspected as soon as possible.
- Repair or replace the tire if necessary.
- Have lug-nut torque checked if you were unable to torque them properly roadside.
Some manufacturers or repair shops may also recommend rechecking wheel torque after a short period of driving following wheel installation.
Can a Flat Tire Be Repaired?
Sometimes.
A tire may be repairable when a small puncture is located within the main tread area and the tire has not suffered additional structural damage.
Damage near the sidewall or shoulder is typically much more problematic.
A tire that has been driven while completely flat may also have internal damage even if the outside looks relatively normal.
I recommend having the tire professionally inspected rather than assuming that every nail puncture can safely be repaired.
When Should You Call Roadside Assistance Instead?
Knowing how to change a tire does not mean you should always change it yourself.
I would seriously consider roadside assistance when:
- You are stopped in a dangerous traffic location
- The vehicle is on unstable or severely sloped ground
- You do not have the correct jack or tools
- The lug nuts cannot be loosened safely
- The spare tire is flat or damaged
- The vehicle has multiple damaged tires
- You cannot identify the correct lifting point
- The wheel is physically damaged or jammed
- Weather conditions make the repair unsafe
Roadside assistance is not a failure. The objective is to solve the problem without creating a more dangerous one.
How Often Should You Check Your Spare Tire?
I recommend checking the spare whenever you perform routine tire-pressure checks or at least periodically throughout the year.
Because a spare tire may remain unused for years, drivers often forget that it is still aging and slowly losing air.
Check:
- Tire pressure
- Tire age
- Sidewall condition
- Valve condition
- Jack condition
- Lug wrench
- Wheel-lock key
It is far better to discover a missing wheel-lock key in your driveway than during a flat tire emergency.
How I Recommend Practicing Before an Emergency
If you have never changed a tire before, I think practicing once at home is one of the best things you can do.
You do not necessarily need to complete the entire process.
At minimum, identify:
- Where the spare tire is stored
- Where the jack is stored
- How the jack operates
- Where the jacking points are
- Whether you have locking lug nuts
- Where the wheel-lock key is stored
This turns an unfamiliar emergency into a process you have already seen before.
My Recommended Emergency Tire Kit
| Item | Why I Recommend It | Priority |
|---|---|---|
| Factory Jack | Required to lift the vehicle | Essential |
| Lug Wrench | Removes and tightens lug nuts | Essential |
| Inflated Spare Tire | Temporary or permanent replacement | Essential |
| Wheel Chocks | Help prevent vehicle movement | Highly Recommended |
| Reflective Triangle | Improves roadside visibility | Highly Recommended |
| Flashlight | Essential for nighttime tire changes | Highly Recommended |
| Gloves | Protect hands from dirt and sharp edges | Recommended |
| Tire Pressure Gauge | Confirms the spare has enough air | Recommended |
| Portable Inflator | Allows you to inflate a low spare | Recommended |
| Torque Wrench | Allows correct final lug-nut torque | Recommended |
Frequently Asked Questions
What are the basic steps to change a tire?
Park safely, apply the parking brake, loosen the lug nuts, position the jack at the proper jacking point, raise the vehicle, remove the flat tire, install the spare, hand-tighten the lug nuts, lower the vehicle, and tighten the lug nuts in a star pattern.
How long does it take to change a tire?
A typical tire change may take about 15 to 30 minutes when conditions are good, although beginners may need longer.
Do you loosen lug nuts before jacking up the car?
Yes. Loosen them slightly while the tire is still touching the ground. Remove them completely only after raising the vehicle.
Which way do lug nuts loosen?
Most modern vehicle lug nuts loosen counterclockwise when viewed from outside the wheel.
Should I use the parking brake when changing a tire?
Yes. Applying the parking brake helps prevent the vehicle from rolling while it is raised.
Can I change a tire without a jack?
Normally, no. A proper vehicle jack or professional lifting equipment is needed to raise the wheel safely.
Can I drive on a donut spare tire?
Yes, but only within the manufacturer’s specified speed and distance limits. Temporary spares are designed for short-term emergency use.
How fast can I drive on a spare tire?
Many temporary spares are limited to approximately 50 mph or 80 km/h, but you should follow the exact limit printed on your spare or stated in your owner’s manual.
Can I put a spare tire on any wheel?
Usually a vehicle’s designated spare is designed to fit the vehicle, but drivetrain design, tire sizing, and manufacturer instructions matter. Follow the owner’s manual, especially on AWD or performance vehicles.
What happens if lug nuts are not tight enough?
Loose lug nuts can allow wheel movement and, in severe cases, potentially allow the wheel to separate from the vehicle.
Can lug nuts be too tight?
Yes. Excessive tightening can damage threads or wheel studs and make future removal extremely difficult. Use the manufacturer’s specified torque.
Should I tighten lug nuts in a circle?
No. A star or crisscross pattern is generally preferred because it helps seat the wheel evenly against the hub.
Where should I place the jack?
Place it only at the vehicle manufacturer’s designated jacking point. Consult the owner’s manual if you are unsure.
Can I change a tire on gravel?
It is better to avoid loose gravel because the jack can shift or sink. A firm, level paved surface is much safer.
Do I need a torque wrench to change a tire?
A torque wrench is not absolutely required to install an emergency spare roadside, but it is the best way to ensure the lug nuts are tightened to the manufacturer’s correct specification.
Final Checklist
- Move away from traffic.
- Park on level, firm ground.
- Turn on hazard lights.
- Apply the parking brake.
- Chock the wheels if possible.
- Loosen lug nuts before lifting.
- Use the correct jacking point.
- Never crawl under a car supported only by a jack.
- Install the spare carefully.
- Hand-start all lug nuts.
- Tighten using a star pattern.
- Use proper torque if available.
- Check spare-tire pressure.
- Follow temporary-spare speed restrictions.
- Repair or replace the damaged tire promptly.
Final Thoughts
Learning how to change a tire is less about mechanical skill than following the correct sequence safely.
The steps themselves are straightforward: secure the vehicle, loosen the lug nuts, lift from the correct jacking point, swap the tire, lower the vehicle, and tighten the wheel correctly.
The parts I consider most important are choosing a safe location, using the correct jack point, preventing the vehicle from rolling, and making sure the replacement wheel is properly secured before driving.
I also recommend inspecting your emergency tire equipment before you actually need it. Make sure the spare is inflated, confirm the jack and wrench are present, and locate the wheel-lock key if your vehicle uses one.
A few minutes of preparation can turn a stressful roadside problem into a manageable one.
For more maintenance guides, see how to check tire pressure, how often to rotate tires, how long tires last, and best portable tire inflators.

I’m Tim George Jr., a former professional race car driver who spent years pushing high-performance vehicles to their absolute limits—from the high-speed ovals of NASCAR’s ARCA Racing Series to grueling road courses. Driving at that level gives you an unmistakable, visceral feel for how a machine should perform, handle, and hold up under pressure.
After hanging up my racing helmet, I shifted my passion for motorsport toward helping everyday drivers, car enthusiasts, and gearheads make smarter decisions. Today, I test, analyze, and review automotive products—everything from performance tires, brake upgrades, and synthetic oils to track-day gear, diagnostic tools, and essential car care accessories.